Fillet show frameset part IV.
It’s time for the fourth in our installment and the penultimate post. This post deals with the building of the fork that goes with the fillet frame I’ve been working on. You will of course notice that the fork is not fillet brazed. I do not normally build fillet forks because I am not at all a fan of unicrown fork blades and the way they ride (too flexible laterally and torsionally) compared to a lugged style crown fork. So……… we will be building a traditional fork to go with out fillet frame.
A fork is very small and simple compared to a frame but it is built using all the same concepts and the proper stiffness and alignment of the fork may even be more important that that of the frame. If the fork isn’t aligned properly there is no way the bike will handle as it should and a fork that is not stiff enough (or is too stiff) can compromise the ride and handling of the entire bike. Forks are important.
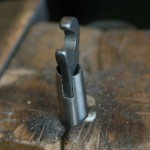
Just like when building a frame the fork starts out small pieces that get combined into subassemblies and these subassemblies are then combined to make the completed part. I start by slotting the fork blades to accept the front dropouts. Before I got into framebuilding I’d always wondered how this was done and what mega high-tech machine was used to do this. And then on my first day working at Serotta in 1989 I saw it done by hand in just seconds and it opened my eyes to how stuff is made in the real world. The slot is made by making two parallel cuts with the hacksaw and then taking the small part left between the cuts and bending 90° out and then snapping it off with pliers. A few swipes with a slotting file and voila! — You have a slot! Getting a good fit takes practice but the concept is very simple. Once the slot is done it is deburred and the end of the blade is ground at an angle to give it a chisel point. It is then fluxed and brazed and set aside to allow it to cool. Once cool the flux is soaked off and the blades are set aside while I work on the crown.
Our second subassembly is the steerer/crown. The two pieces are cleaned and the fit is checked and the two are brazed together. While the dropouts are brazed into the blades with brass (it has much better ‘fill’ properties) the crown to steerer joint is done in silver to keep the heat to a minimum. Once brazed the flux is soaked off and the crown is prepped to get it ready to accept the blades. This involves shaping the shoreline of the crown to the look I want and getting it all clean and neat.
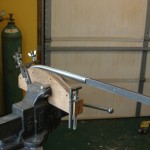
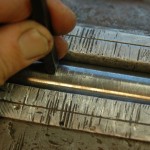
The steerer/crown is now set aside while I work on the blades again. First up is bending the blades to give the proper fork rake. This is a very simple operation if you have the proper tooling. I use a bending rig or my own design and manufacture that lets me bend the blades to the radius and duration I need for a given fork. It’s a simple matter of setting the stop and then using the big pull-bar to bend the blade. Once the blades are bent they are checked to be sure that they have the same bend and then they are cut to length using my very high tech fork blade tool. The tool is a plate with adjustable rake and length so I can mark the length and cut them. The same tool is then used to check to be sure that I have two blades of the same exact length once they are both cut.
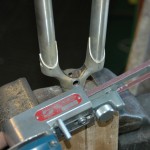
With the blades cut I now drill a very small hole (to be filled later) that will let the hot air in the blade to expand and escape during the brazing process. Then everything gets cleaned and fluxed and loaded into the jig. The jig is set of the proper fork length (technically called ‘span’) and rake. Once everything is loaded and double-checked it is brazed. The fork is small and light and the brazing goes very quickly — less than 10 minutes from the time I turn on the torch until I pop it off. After brazing the blades into the crown I fill the small gas holes and then everything is allowed to cool.
With the fork now cool it goes into the hot bath to soak off the flux for the last time and then the fork is ready to be aligned. As mentioned above the fork alignment is super-critical and I take great pains to make it just right. First the fork is held on its side and the blades are checked to be sure that they have the same rake and then the dropout faces are measured down to the plate. I set the dropout faces to plus/minus .005” being equidistant from the fork centerline. So I end up with the dropouts the right distance apart (100 mm) and they are both the same distance from the centerline of the steerer. This makes it so that when the wheel is installed that it will set dead vertical.
Using the dropout “H” tools I now check that the dropout faces are parallel and concentric to one another. The last alignment step is to place a calibrated wheel in the fork and be sure that the rim is the same distance from each fork blade or centered.
With the alignment done I now drill to crown for the brake and move onto making the fork pretty. The shaping of the crown is done roughly with a handfile to get rid of the extra steerer protruding from the underside of the crown and with a handheld belt sander called a dynafile. I like dynafiles a lot. I’ve been using them for over 20 years now and they still make me smile. I rough out the shape with the dynafile and then move onto file-backed emery and finally strips of emery — just like on the frame. I want the edges to be crisp where they should be and soft and round where they should be. I can tell by the way the light plays off the crown when I’ve got it right and when it will look just right under shiny paint. I also do the finish work and shaping of the dropouts at this point and getting them looking the way I want.
The finish work done I now move onto the final steps of machining the crown race with a shell reamer and then finally stamping the serial number into the steerer. And with that step the fork is done and ready for paint.
How is gets painted will be up to the frame’s new, and as of today, still unknown owner. If you are interested in this frameset it will be ready to go to paint right after the show so you could shave a good 9 months off the wait for a frame. Please contact me if interested.
The next and final installment will be some studio shots in a day or two when I have the shipping crate/show booth moved out of the way of the photo studio.
Thanks again for reading and letting me share this with you.
Dave
-

- all the parts
-

- sharpie marks for slotting
-

- rough slot
-

- fine tuning slot
-
- checking fit
-

- fluxed and ready to braze
-

- still hot dropouts
-

- shaping the crown shorelines
-

- blade in bender
-
- bent blade
-

- marking to cut length
-

- jigged parts
-

- freshly brazed and hot
-

- on the plate
-

- “H” tooling dropouts
-

- checking for wheel centering
-

- recessed brake hole
-

- filing off extra steerer
-
- dynafile how I love thee
-

- crown shaping
-
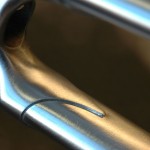
- crown shaping
-

- and yet more crown shaping
-

- shell reamer for crown race
-
- serial numbering
-

- ready for paint
-

- view when I finished fork – really cold out!
Share this Article:


Thanks for taking the time to post these. It’s really nice, as a future owner of one of your bikes, to see the process. One question, again asked as a future owner of a Kirk: handmade stems?
Hello,
Thanks for the comment. I’m sorry but stems are no longer on the menu. I made them for years and lost money on every one of them I think.
Sorry,
Dave
This is some of the best documentation on the web for anyone interested in framebuilding–Mr. Kirk, that is as well-made and finely-crafted as bicycle forks get. You’ve shaped and contoured the crown without making it look manipulated and fussed-over, and that shows that you’ve not only built many of these, but that you know exactly what you want a fork to be, functionally and aesthetically. This is my favorite installment yet in your series.
Why seal the vents, though?
Good Morning and thanks for the note.
It’s good to hear you have enjoyed the series. I know I’ve enjoyed doing it. It takes a good bit of time to do and would be impractical to do all the time but it is fun to do this once in a while.
Why seal the vents? I seal the vents just to keep moisture out. When brazing the fork it is obviously pretty darn warm and this makes the air that is in the blades as dry as air can be so when I seal the vent holes the air left in there makes the desert seem like a swamp. So with the vents sealed I am sure that no moisture will ever get into the blades.
I treat the seat stays in a similar way. There is a vent hole in them and then both ends are brazed leaving the air inside hot and dry and when I seal the hole is traps that dry air inside. I’ve been building like this for over 20 years and have never seen a corrosion issue with a stay or blade. It’s interesting……… I feel the tubes need to be fully open so there is true air exchange (like a down tube open to the bottom bracket) or they need to be completely sealed.
Thanks again,
Dave